Easy beginners guide to creating a blog in 2020

As featured on..
How to start a blog featured on Forbes, Huffpo, Entrepreneur, & Yahoo

Hi, welcome to StartBloggingOnline.com

This site is the easiest way to learn how to start a blog to make money or for personal or business use, with no prior experience and be online in under 30 minutes.

Over 15,000 profitable and successful blogs have already been made using this guide and our goal is to increase that number to 100,000! Are you next?

Click the button below to get this easy step by step video guide for free now.

Last Updated on

So you want to learn how to create a blog?

That’s great!

Not only is blogging a great pastime, but it also allows you to express yourself in a unique way, help others with problems you’ve overcome, establish yourself as an expert, and make money.

The goal of this guide is to show you the quick and easy way to start a blog TODAY. Not tomorrow, next week, or next month… but right now.

From 5+ years of coaching and helping friends with their blogs, I’ve found that most people make the same mistakes, sometimes resulting in them abandoning the project altogether…

We don’t want that to happen to you!

Here’s the deal:

First off, open up this link in a new tab.

This is where we will be getting our hosting and domain. Once you have done this just follow along below…

Today I want you to take the time to thoroughly read this blog post. It’s it looks long, but you only need the first 6 steps today (the rest really deals with running your blog ongoing) and it will be easy for you to follow.

You’ve probably been putting this off for a while, you may even be asking yourself if you should even bother starting a blog at all. So today I want to set your mind at ease and help you to make your blog and share your knowledge with your readers and the world once and for all.

Ready to create your blog today? Alright, let’s learn how to start blogging.

This comprehensive resource will walk you through the process of starting a blog in just 6 easy steps…

How to start blogging today

How to start a blog from scratch in 6 simple steps

1. Decide what to start a blog about

How to start a blog step 1You probably already have a general idea of what to start a blog about, but let’s look at a few blogging tips for beginners just in case you are not quite there yet.

1. Avoid choosing too broad of a niche.

For example, don’t just blog about fitness, blog about marathon running or resistance training in particular. Keeping all of your articles in a tight niche to begin with will help Google to see that your site is an authority on the subject and they will send you more visitors if this is the case.

The above isn’t designed to crush your dreams of making a huge site, this is quite possible later on. You can expand into new categories of course, but it is a lot easier to get the ball rolling with readers and traffic if you stay focused to begin with.

2. Try to create evergreen content.

Write about topics that people will always be searching for, even in the future.

To give an example of this in the fashion niche (Notorious for this problem), people will always be searching for the best flats under $100 – this is unlikely to change massively over the years. If you write about a particular Chanel model that was popular for one season, expect that people may no longer need your content after a short amount of time.

2. Choose a blog creation platform

How to start a blog step 2Before you can even begin worrying about how your blog will look, you’ll need to know the best place to start a blog. This is known as a blogging platform (or content management system in tech-speak).

I know all of the best blog hosting sites but I’ll show you the easiest (and most popular) platform to use. This platform will also give you the best chance of ranking well in the search engines.

There’s no point in making life difficult for ourselves now is there?

Our #1 Choice For Hosting Blogs

62% Off Exclusive Offer Applied at Checkout

Regularly

$6.95/mo

Starting From

$2.64/mo*

  • Free 1 Year Domain Registration on Select Plans
  • FREE SSL Certificate
  • Drag-and-drop Website Builder
  • E-commerce Ready
  • 1-Click WordPress Installation

How is a blog created most often?

How to start a blog on the right CMS

BuiltWith.com1 puts this percentage a little lower, but you can still see how overwhelming the use of WordPress is for those starting a blog:

Blogging statistics for top CMS worldwide
Platform Usage
WordPress
34.33%
Blogger
1.16%
Medium
0.12%
Ghost
0.09%
MoveableType
0.02%
Tumblr
0.01%
Blog Engine
0%
PageKit
0%
PostHaven
0%
Anchor CMS
0%
Hexo
0%

Given that there are over 72 million active users using WordPress today, it’s clear that WordPress is the best place to learn how to start a blog from scratch hands down.

All of my own blogging sites are built with the WordPress blogging platform.

Here’s why:

  • It’s FREE for bloggers to start using: (including themes, layouts, and add-ons that many other blogging platforms don’t provide).
  • It’s super easy for a new blogger to set up: I’ll show you exactly how in a little bit…
  • It’s safe & secure: WordPress is always updating their software and keeping everything sound and secure, so there’s rarely a worry of having your blog come under hacking attacks. No wonder NASA, Time Magazine, and even top university blogs are using WordPress.
  • It’s HIGHLY customizable: There are hundreds of free themes and plugins that add more functionality to your blog, from contact and subscribe boxes to plugins that improve blog performance and more.
    While the other blogging platforms are generally all pretty okay; nothing, in my opinion, has ever come close to matching the freedom and customization options that WordPress offers.

So without a doubt, go with WordPress. Especially when you are new with the idea of putting together a blog.

Self-hosted is the best way to start blogging online

Without a doubt, you need to start by self-hosting your WordPress blog. This means you are in complete control of your own website and content.

Think about it – what famous, successful blogger you know is using a free blogging website like “startbloggingonline.freeblogsite.com” instead of their own name like “StartBloggingOnline.com”, for example?

It’s not just that – blogging platforms that you don’t have to pay for will cause you other headaches too.

It gets worse:

  • You don’t control your content: the blogging platform does. They could shut you down anytime, and for any reason.
  • The web address of your blog will be long and hard to remember (like www.yourfreeblog.blogspot.com) instead of a catchy, branded address you choose.
  • You’re not allowed to advertise on most free blogging platforms, making it much harder to ever make money from blogging.
  • Nobody supports a freebie blogger, you’ll be on your own right from the start with nobody to turn to if your blog hits problems

All of these limitations apply if you’re starting on the WordPress.COM blogs.

What you really want is to start a self-hosted WordPress.ORG blog – it’s the same software without all the limitations!

Begin by learning about starting a blog on a self-hosted platform with your own blog domain from day one. That way you won’t have to experience the massive technical headache I did when transferring from a free to self-hosted WordPress blog.

Setting up a blog like this is WAY easier and less expensive than you might think, especially with the special deal and coupon code I’ve got for you below…

3. Pick a great web host

Finding a domain name and web host

How to start a blog step 3Now to the exciting part!

To start a blog on a self-hosted website with your own unique name, you’ll need two things:

Domain name – This will be your personal blog address where people find your awesome articles over and over again. For example, Google’s domain is www.Google.com. Your new blog domain will be www.YourBlogName.com, except you’ll choose what’s going to be in place of “YourBlogName”.

Blog hosting – This will be the home of your blog address and content that’s on the blog. Without web hosting, you’ll be unable to use your domain. Think of it as a computer hard drive that stores all your content on your blog (images, blog posts and so on).

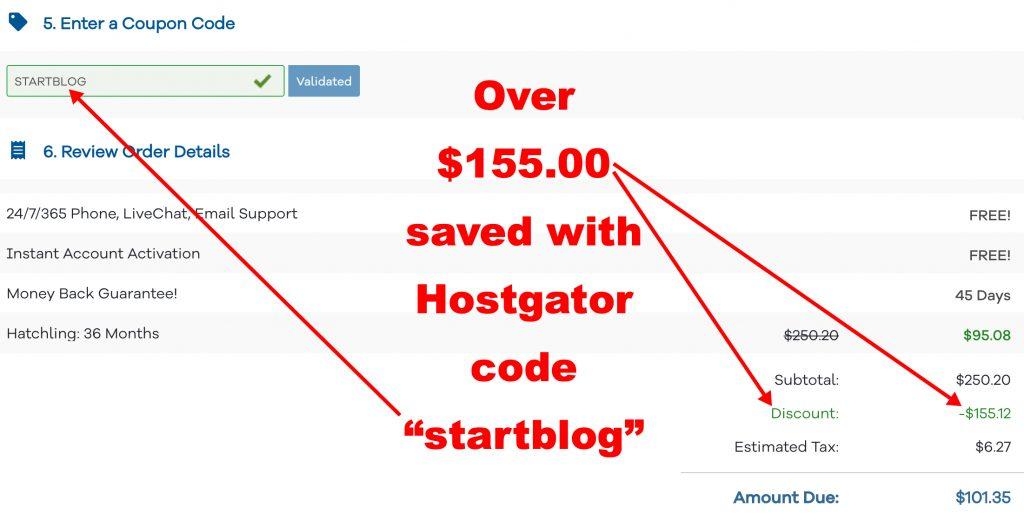
The cost of a good web host is usually somewhere between $10-15 per month, but you will get up to 62% OFF with the coupon code below.

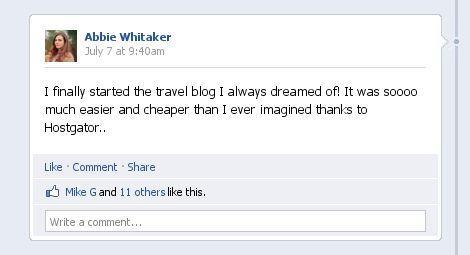
If you start today with my special deal below the total cost of your blog will come out to less than a venti coffee at Starbucks a month – so it won’t break the bank.

It’s a relatively small, yet extremely important investment for your long-term blogging success.

Where should I get my domain and hosting?

When it comes to web hosting, there are only three things that matter to bloggers.

  1. Page load speed: The average amount of time (in seconds) it takes your blog to load.
  2. Uptime: How often your site is up and running. 100% uptime is not really realistic, but a very good web hosting company will give you 99.9% uptime.
  3. Customer service: how responsive your host is if you have a problem.

There are literally THOUSANDS of different blog hosting providers.

Yes, thousands.

They all offer you a similar service (domain name + hosting) with a relatively similar price.

And luckily for you, I’ve already done the research to narrow the list down to the one and only reliable service you should consider using when starting a blog for the first time.

Note: As a longtime customer and independent review site, we get compensated if you purchase from the referral links below – at no additional cost to you. In fact, we have a killer blog hosting discount coupon so you will actually pay less for the same service through the links below.

Remember, I want to help you avoid the same mistakes I made when I first got into the blogging world, and save you from experiencing any sleepless nights from scrambling to get your blog back online.

I’ve dealt with and monitored many famous and recommended web hosting companies like Bluehost, iPage, Godaddy, etc…

…but now I only use and recommend HostGator.com for 62% off the price of your blog.

Our #1 Choice For Hosting Blogs

62% Off Exclusive Offer Applied at Checkout

Regularly

$6.95/mo

Starting From

$2.64/mo*

  • Free 1 Year Domain Registration on Select Plans
  • FREE SSL Certificate
  • Drag-and-drop Website Builder
  • E-commerce Ready
  • 1-Click WordPress Installation

HostGator gets my vote as the best web hosting for blogging on WordPress since they really care about helping bloggers like you and me get started as quickly and easily as possible.

Want to know the best part?

Since I’ve been using these guys for so long they gave me a special coupon to get my readers out on the blogosphere for cheap…

Typically you’d have to shell out over $10 per month to get a plan with a premium host but today there is a starting price/mo of only $2.64.

And if you create a blog with them today, they’ll throw in the domain name free of charge!*

That’s 62% OFF on the only hosting plan you’ll ever need with coupon code “startblog“.

But like all great deals this opportunity won’t be around forever…

This is the best price for blog hosting you’ll find anywhere. For just $2.64/month you have little to lose (there’s a 45 day money back guarantee) and only tons of fun blogging experience to gain.

What makes HostGator so great?

Nothing has ever come close for me in terms of blog load speed, uptime, ease of use and great customer service if you get stuck!

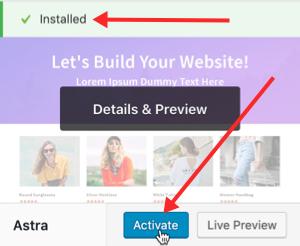
HostGator has great performance, they are easy to use, and it’s absolutely the best pick for beginners like you.

Additionally, they are one of the few places supplying web hosting with free SSL certificate as part of the package. The SSL not only adds trust with Google, but with your site visitors as well!

How to start a blog with a free SSL certificate
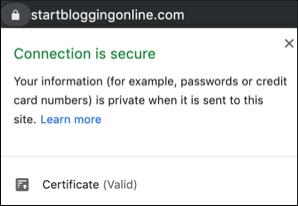
With an SSL Certificate, your site will use HTTPS and show up as Secure with a padlock next to the URL in a browser like in this image:

Aside from HostGator I have tried all of the industry leaders like:

and even GreenGeeks (who I also love) and I honestly believe this is the best hosting provider beginners can choose today, but you can always go with another hosting service as long as it’s fast, reliable, offers unlimited bandwidth, and a free SSL certificate. This helps you to avoid problems later on.

Basically, with HostGator you’ll be creating a blog that will look legit from Day 1.

Now that we’ve gone through the basics of blogging platforms, it’s time to start walking the walk!

With the next step, we’ll get your blog set up and running.

Let’s get crackin’:

4. Set up your blogs hosting

start a blog step 4If you don’t have a hosting or a domain name yet – don’t worry. I’ll be showing this in a minute…

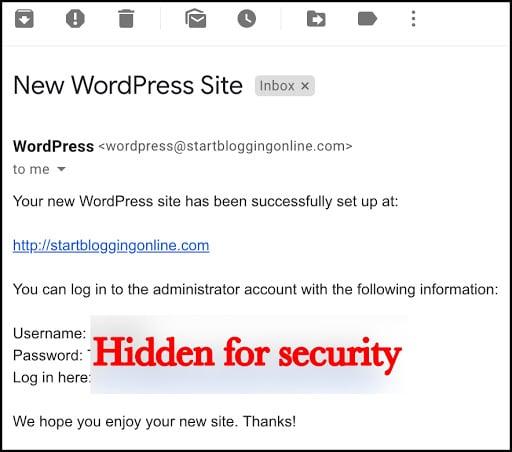
At the end of this step you will have a fully working self-hosted WordPress blog on your own domain!

Sounds promising, huh?

If for some reason you don’t want to use HostGator, you can always choose another hosting provider. I can’t promise they’ll be that good, but the registration and the setup process should be somewhat similar.

Unlike HostGator, some hosting companies also do not have one-click install for WordPress. If that’s the case, you can find guides on YouTube for installing WordPress manually (not recommended for beginners, though). They also might not have unmetered disk space, so be sure to check this also as it may cause you problems later!

Go to HostGator.com then click the "Create NOW" button!

Remember: Since I’m using these guys regularly myself, I’ve got an exclusive HostGator promo code for you as thanks for using this guide (62% OFF).

You will get premium hosting for only $2.64/month instead of $6.95! You will not find a deal this good anywhere else…

It gets better:

The coupon code “startblog” will be applied automatically when you click the link below and you’ll be entitled to a free domain name! Enjoy 🙂

5. Choose your blogs domain name

If you already have a domain name, then just enter it in the right hand tab (the one that says “I already own this domain”) and keep reading…

How to choose a domain name

(My readers get this FREE!)*

How to start a blog step 5
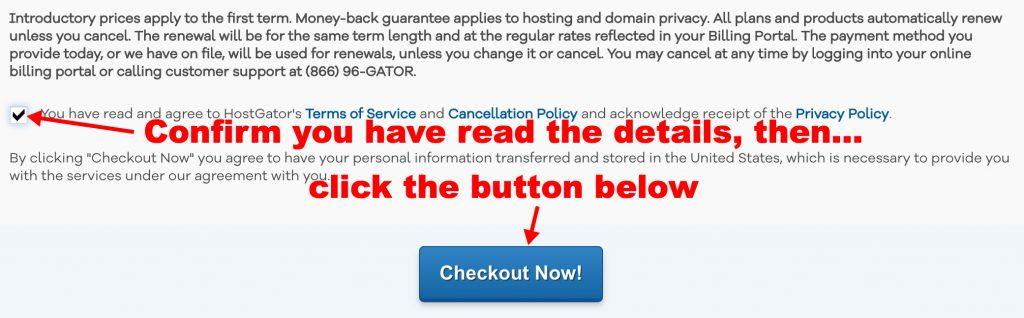
Choosing a bad domain name is one of the most common mistakes I see bloggers make(#doyouevenblog). Be sure you choose a domain name that is…

  1. Easy to Remember: Don’t choose a nonsense name, something tough to spell, or a long name full of dashes. “best-tech-gadgets-in-the-world.com” won’t ever stick in someone’s head, but something like “techgeeks.com” rolls off the tongue.
  2. Unique and Descriptive: You want a name that reflects who you are and what you care about. Be creative and build an identity you’re excited about!
  3. Trustworthy: Domain extensions like “.com”, “.org” or “.net” are the most popular, with “.com” being the one most people think of first. Try to avoid crazy extensions like “.rocks” or “.biz”, as these are less commonly used, tougher to remember and not as trusted.
  4. Not your own name: There may come a day when you start thinking about selling your blog. It makes it very hard to do so if the domain name is your own name!
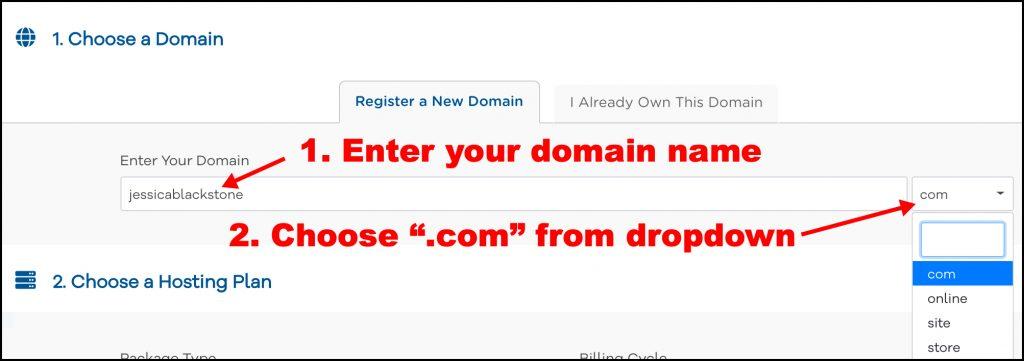
  5. Is your own name: On the flip side, some people are blogging for personal fame and fortune. If this is you, and you are never going to sell your site this is the option for you. For example, if my name was Jessica Blackstone”, I would go for the name “jessicablackstone.com”.

Type the domain name you want to use in the “Enter Your Domain” box, then choose “.com” from the dropdown. If the name is available, you’ll be able to claim it. If it’s not available, choose another one.

How to start a blog on HostGator

If the name you want isn’t available, HostGator will show you some alternatives that are similar – or you can punch in a new name and try again. I’d suggest you use something that ends with

  1. .com
  2. .net or
  3. .org

How to create a blog hosting plan

Next I recommend the “Hatchling” plan for now – you can always upgrade later if you decide you want more advanced features, but you get more than enough to get started with Hatchling.

HostGator signup step 2

Next in step 3, you will enter your contact and billing information as you would when making a purchase pretty much anywhere online, after which you will have to option to add or remove extras.

I would take a look at each of these additional services to see if you want any of them, but they are not 100% necessary for you at this stage, so I have removed them and you can do so too.

Start a blog without these additional services

You’ll see that it says “$250.20” as the hosting subtotal, but the “startblog” promotion code will be applied and as you can see, the total is update to $95.08.

Also, you will get your domain name completely free!

In the amount due, you have saved over $155.00! (See image below if you are unsure if your discount has been applied.)

HostGator coupon discount "startblog"

Complete your hosting registration

Once you are happy that everything is correct with your order details, the only remaining step is to agree to the terms and services and click the “Checkout Now!” button.

HostGator checkout

How to create a blog in your new account

You will get a confirmation email from HostGator, it may take a few minutes to register your account, so be patient.

Once you have this confirmation email you will have the details to log into HostGator and install WordPress via your cPanel, the video below will show you how to do that quickly and easily using QuickInstall:

You’ll now get your details for logging into WordPress, and you’ll also get these details via email like this:

WordPress confirmation email

There, that wasn’t so bad was it? You’re now off to the races!

Log in and check out your new blog

So now you have the email (shown above) that shares your login information, including the “Admin URL” (this is the “Log in here” URL in the email).

To log in to your blog, click this URL. If you forget this URL, it’s simply yournewblog.com/wp-admin (where “yournewblog” is your domain name).

Congratulations!

You now know how to make a blog using WordPress. You’ve got WordPress installed and your blog set up, all on your own! (Well… almost! 🙂 )

As you can see, it was really easy and straightforward.

Now that you know how to start your own blog, read on to learn how to make your blog look nice and unique, and write your very first post.

6. Build a successful looking traffic attracting blog

How to start a blog step 6
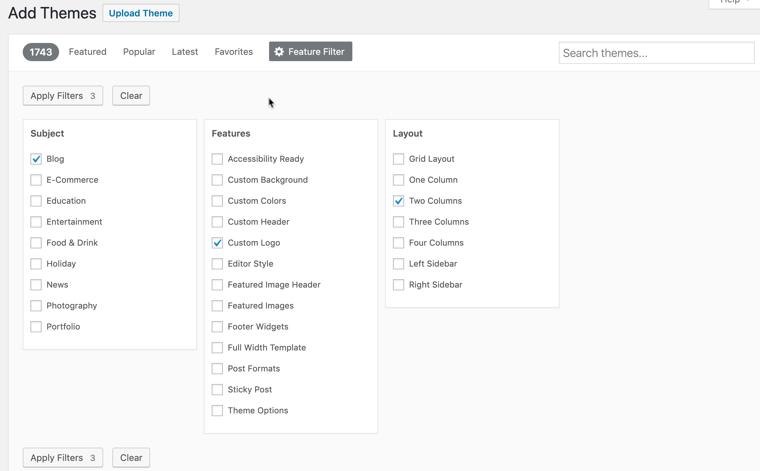
In this section, I’ll show you some WordPress blog basics, including:

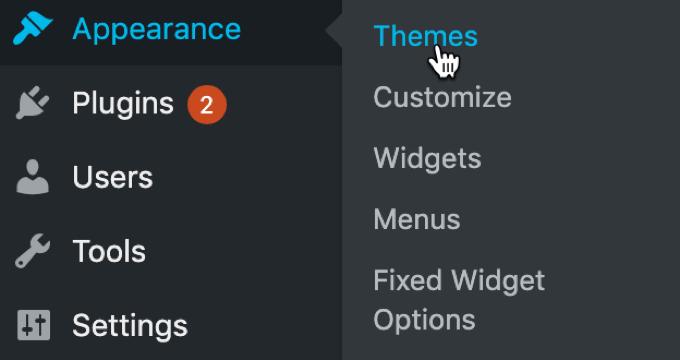
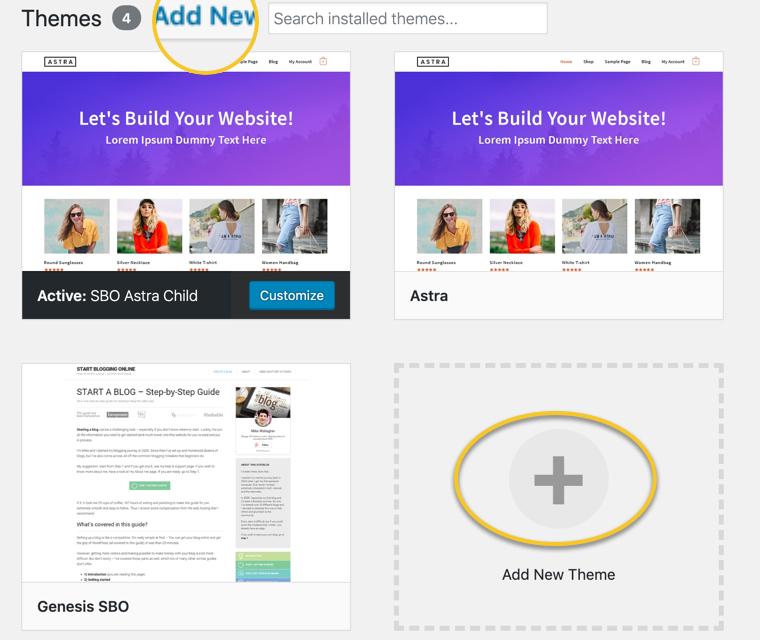
  • Changing your blog’s design
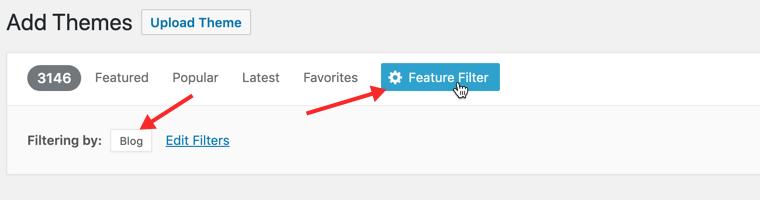
  • How to make a blog search engine friendly

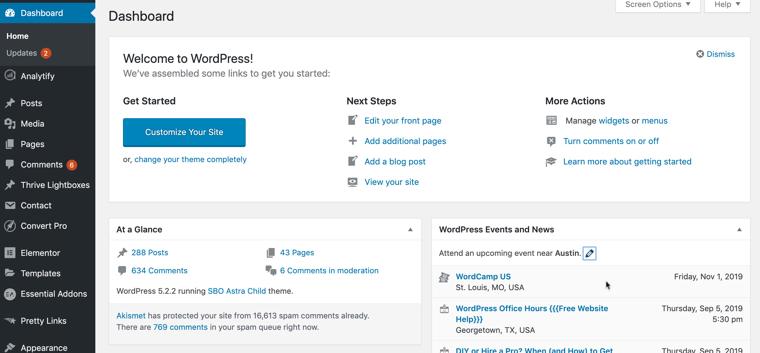
If you’ve set up your blog, you’re now ready to start using WordPress and customizing your blog. I promise – it’ll be pretty easy and fun at the same time.

Remember: You can log in to your blog by going to yourblog.com/wp-admin/ and using the credentials you set up with HostGator or any other hosting company you used.

How to start a blog right with Pat Flynn
Example of a customized WordPress blog (SmartPassiveIncome.com)

Change your blogs design (themes & layouts)

WordPress blogging platform uses design templates called “WordPress Themes” to figure out how your site should look. Changing your layout and design is as simple as installing a new blog theme.

There are over 2,000 professionally designed, fully-customizable and free themes to choose from – so you’ve got a lot of options. If you want to see premium themes and designs that will really help you hit it out of the park.

Here's how install a theme you'll love:

When you log in for the first time, you’ll see a dashboard or admin panel that looks something like this:

WordPress dashboard
Here’s how to start from this screen: Mouse-over the “Appearance” tab in the WordPress sidebar, then click on “Themes”.
How to change blog theme
On the next screen, you’ll see several themes are already installed. If you don’t like those, click the “Add New” button at the top, or the great big “Add New” square to start searching for a theme.
Now, you’ll see tabs where you’ll find featured, popular and brand new themes, as well as a “Feature Filter” and search bar.

I really like the “Feature Filter” option, because you can choose blog themes in certain color schemes, select specific layouts and even start with themes with built-in advanced features. Starting a blog with a specific theme type is a good idea so think about what you want here.

Just choose the options you want, then click “Apply Filters” on the left hand side. If you’re finding this challenging, just search by keyword – there’s no wrong way!

When I’m starting a blog from scratch I usually go with Astra because it’s really fast and has lots of options. I really think it’s the best free WordPress theme for starting a blog right now, but you may have different preferences.

Either way, when you do find something you like, click “Install”. Your blog’s nearly done!

Once the theme has been installed, all that’s left to do is click “Activate” on the next screen:

Configuring your blog to be search engine friendly

There a couple of things you need to do to make your blog more search engine friendly.

Let’s start by get rid of ugly and clumsy URLs like:

yourblog.com/2020/01/topic-a/author-theodore/how-to-start-a-blog.

A much better way of starting a blog properly is to use: yourblog.com/how-to-start-a-blog

See the difference? One is filled with irrelevant information and the other one is short, clean, neat and contains the theme of our article which in this case is “how to start a blog”.

In order to change your links to a cleaner format that people can read more easily click on the Settings > Permalinks and use the settings from the image below and make sure /%postname%/ is in the custom structure field:

how-to-change-permalink-in-wordpress-blog

Secondly, prevent people from leaving spam comments.

Unfortunately, lots of people want to leave a reply to your content which is really just an automated spam comment. They do that for a couple of reasons – to get people from your blog to their blog and to advertise their services/products.

To avoid that, make sure you moderate your readers comments. Here’s one way to do that:

Go to Settings > Discussion and tick the option shown below.

How to stop spam comments on my WordPress blog

Bonus content

How to become a blogger that makes money successfully

1. Install essential blogging plugins

So like every blogger, you might feel like a kid in a candy store when you first start searching for plugins in the back end of WordPress, but hold your horses there! The first thing you need to know is that it is not a good idea to install too many plugins on a blog because…

  1. Installing lots of plugins WILL slow your site down
  2. Building on the above, low quality plugins are ‘heavy’ and will slow your site more
  3. Some plugins cause conflicts when used together and this may crash your site!

I have done a ton of experimentation over the years to find the essential WordPress plugins for bloggers and here are the only plugins I feel you need when starting a blog. These guys will play nicely together so there is no risk to your site either.

To find them, simply head to your WordPress dashboard and go to Plugins > Add New and type the name of each plugin into the search field.

1. Rank Math (not Yoast)

Although we have covered some basics of setting your site up correctly for search engines, the Rank Math plugin will help to add a few more valuable SEO tweaks, and on top of this you get to learn how to start using SEO in your actual articles in a completely painless way and for free!

2. Jetpack

Jetpack has a ton of features, but here are a few of my favorites:

  • Social sharing buttons
  • Site monitoring (is your blog up and available to the public?)
  • Easy to create and activate contact forms
  • Brute force attack protection (security)
  • Image CDN (Puts all your images on their server so your site loads faster)
  • Site stats (give you data about how well you are doing for visitor traffic)

Plus around 20 more features!

This may sound like it flies in the face of having too many plugins on your site, but with Jetpack, the plugin is…

  • Made by Automattic, the creators of WordPress so it will always be updated and secure
  • The code is incredibly clean and light
  • If you are not using some of the features just switch them off and they are no longer loaded on your site (no excess bulk code that you don’t need)
  • Removes the need to add multiple other plugins which do the same jobs

3. WP Super Cache

This plugin will help you to make your site faster by serving a cached version to your visitors. This is very important as it will both directly and indirectly help your site to get more traffic from Google.

4. UpdraftPlus – Backup/Restore

Although your host will usually have a backup of your site and/or be able to roll your site back if you break something, I always hover on the side of caution and create my own site backups. This plugin will take care of that by regularly sending a copy of all your sites files to Dropbox, Google Drive, or one of many other services so you always have the peace of mind of knowing you will never lose all of your hard work.

5. Optimole

When you are creating articles you will no doubt be adding images, and these images are often the largest parts that your site has to load for visitors. If these image files are too big then it can really cause problems for your loading time. Optimole reduces the size of these files so that the site runs like greased lightning for your visitors, but that’s not all it does.

6. Elementor

Once you get the basics of blogging down and you want to start adding great looking design features, buttons, graphics, social sharing widgets, carousels, and a whole bunch of other stuff you NEED to see (you can customize your whole blog without knowing any coding at all!)

You can’t go wrong with Elementor. It’s incredibly easy to use and you’ll find it invaluable on your new website.

And that’s it!

You will of course end up installing more plugins at some point later in your blog’s life, but the above are what I consider some of the best WordPress plugins for news sites and they are more than sufficient to get you off to a fantastic start with your site.

2. Create your important pages

what pages for blogOne of the first things you will likely be a little confused about when you get into the admin area is the difference between WordPress pages vs posts. I like to think of it this way:

Pages are not the actual ‘interesting’ meaty content of your site, they are more likely to be the sort of thing you will find on almost all sites such as the ‘about me’ page or legal pages.

The first thing I’d do with my blog is to create proper “About Me” and “Contact” pages. This lends some credibility to your site both in the eyes of your visitors, and search engines.

As I am not a lawyer, it would be irresponsible for me to tell you what to put on any legal pages you create (so please don’t consider this legal advice), but it is always a good idea to add…

  • Terms of service
  • Privacy policy

First of all, don’t panic! 🙂 This may look like a nightmare but it is really quite painless and there are a couple of ways to go about doing this for free (although you could invest in having a lawyer draw up these pages specifically for your site at a later date).

The first is to go to Google and search “free terms and conditions generator” or “free privacy policy generator”. There are plenty of sites that will painlessly run you through a series of questions about how you plan to use your blog and then provide a template terms of service/privacy policy.

The second method is to use a WordPress plugin which will essentially do the same thing. This is slightly easier, but I personally prefer to keep plugins to a minimum and usually go the first route.

How to create a WordPress page

Simple, head to:

WordPress dashboard > Pages > Add New

And a new page will be created. The layout here is very similar to what you see when you create a new post (see below).

3. Brainstorm blog categories

OK so you may now be asking yourself “what categories should I start with on my blog?“, and while there is no concrete answer to this it helps to understand what categories are actually used for on WordPress.

Basically, categories are a blog topics list to help visitors zoom in on the particular subject matter that interests them the most by placing them in a neat section.

Let’s take our marathon running example from earlier…

Of course, our overarching theme here is marathon running, but the marathon specific categories which sit under this might look something like this:

  • Clothing
  • Training
  • Mindset
  • Equipment
  • Diet and Nutrition

You get the idea right? You often see links to a sites multiple category pages like this on the sidebar or in the header menu of a blog.

Don’t get overwhelmed with this when you begin creating a blog!

As mentioned earlier in step 1 on choosing a niche, just pick one or two categories to start the ball rolling and post heavily on those first as this will show Google you are an authority on these ‘sub-niche’ subjects and they will send you more traffic.

Later as you start coming up with more ideas for articles you can begin to add more categories as you see fit.

4. Make content creation strategy and editorial calendar

This might sound like a boring stage that you can just skip right?

You know what you want to write about so why not just get on with it!

Well, there are a couple of reasons:

  • Spending a day strategizing your posts for the next month allows you to just get to writing every day without having to sit down and think about it. This will turn you into a blog engine which pumps out content.
  • Placing your planned posts into an editorial calendar is like setting goals and will help you stick to a structured plan.

How to build a blog content strategy

With regards to your content strategy, try to plan out all of the different posts you want to get written for the upcoming month.

  • What will the title/headline be?
  • What will the subsections (sub-headers) be?
  • What are the particular keywords this site will target?
  • What are a couple of great resources that can help you look into this topic?
  • Is this related in some way to existing content you have written? If yes, make a note to link internally to it.

Try to get all of these details down for each article you plan to write for the next month. When it comes time to write you will have everything you need in front of you.

What should you use to make this content plan?

You can use something as simple as Google docs or even a text note, but I like Trello as it fits nicely in with learning…

How to create a content calendar

The basics here?

Take each piece of content that you have planned and add it into some sort of calendar system where you can keep track of how you are doing while actually following your plan!

Also, be sure to make an appointment with yourself at the end of each month to create your content strategy for the following month so that the cycle continues.

Trello is absolutely amazing for this purpose, you simply create a card for each piece of content which will contain all the details you put together when developing your content strategy. Then you add a deadline to each card which will be the publish date.

You can even add people to your Trello boards at a later date if you start hiring writers, but that’s not the best part. Wait for it…

It’s also free!

5. How to start online blogging

So in step one you learned about getting set up on WordPress and by now you should have a fully working WordPress blog on your very own domain name. You should also have a custom theme that fits with your blog’s topic and have a blogging strategy and calendar.

Congrats again – you’ve done a LOT more than most bloggers and I’m proud that you’ve managed to get so far.

Here in the penultimate step, I’ll show you how to write your first blog post and share some tips for writing blog posts well.

In this section, I’ll show you…

  • How to add blog posts to WordPress
  • How to add images, links and format text in WordPress
  • Some quick tips and tricks for writing great content

Using WordPress to blog

To add a new blog post, click the “Posts” section on the left-hand side-menu, then click on “Add New”.

How to post on a WordPress blog

On the next screen you’ll see something like this:

Where is the publish button on WordPress blogs

You can add the title to your blog post in the top field, and your content goes in the big text box below the title.

You can save your draft or publish your content live by using the box menu on the far right of the page. You can even schedule posts to be published later – or make posts private so only invited users can see it.

Blogpost status visibility

Once published, your new post can be found in the “All Posts” section of the “Posts” tab, so you can edit it anytime.

Let’s take a quick look at some things you can do to spruce up your post:

How to add images in WordPress

Add image to blog poat
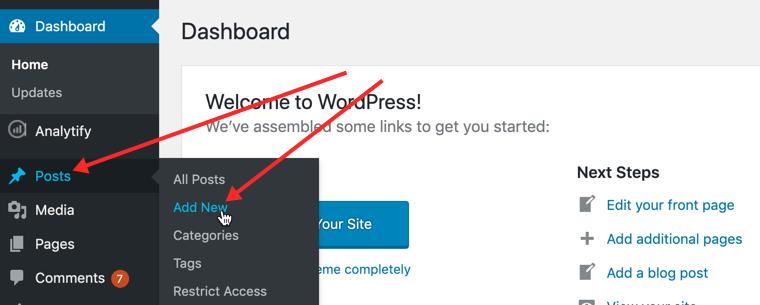
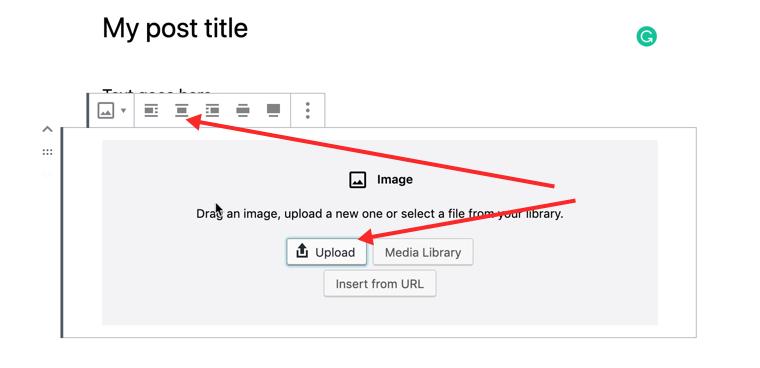
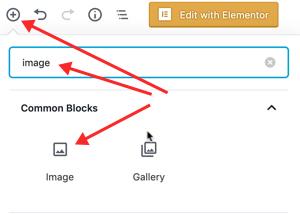
To add an image to your posts, click the plus button right above the headline field.

Tip: type what kind of block you are looking for into the search field. In this case, you would type “image” to find an image block to insert into your new blog post.

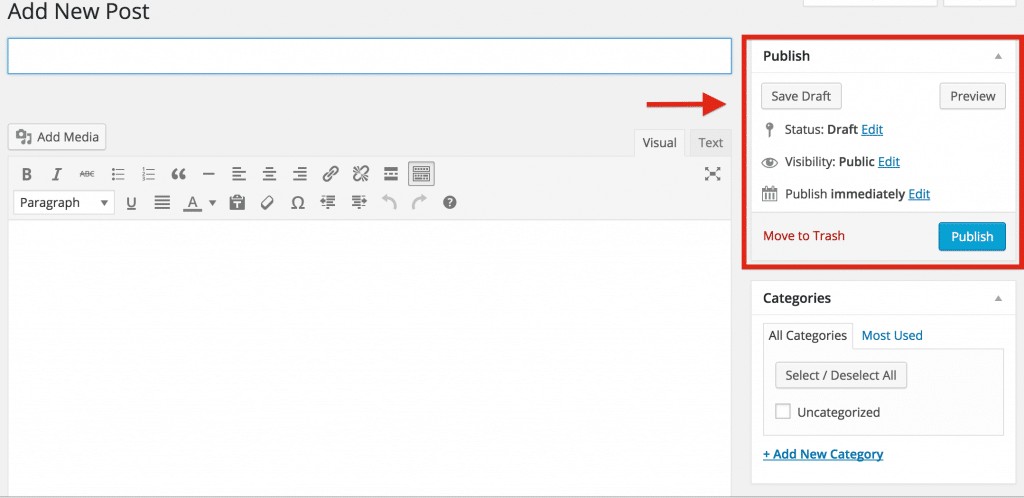
Next, choose the alignment of your image (I am selecting center in the image below), and click the “Upload” tab on the screen that pops up.

Once you’ve found an image that you want to upload, double-click it and WordPress will upload it automatically.

When the upload is finished you can add a new “paragraph” block by clicking the plus sign at the top of the page again.

How to add links in WordPress

Linking out to other blogs is a great way to build relationships and share interesting content.

To add a link, highlight the text you want to turn into a link and then click on the icon in the toolbar that looks a bit like a chain link.

How to add a link in a WordPress blog post

On the pop-up, you’ll need to enter paste the URL of the page you want to link to, you can also choose to open the link in a new tab so that you don’t start losing visitors when they click the link.

Make links open in new tab
  • URL is the web address of the link you want to share. Make sure you include “https://” before the blog address, or your link will be broken.
  • Link Text is the text you want people to click on to get to your link. It might be “Click here”, or anything you choose.
  • Open link in a new window/tab: it’s a smart idea to check this box. Otherwise, when someone clicks your link, they’ll leave your blog.
  • If you want to link to existing content, you can use the “Search” section to find a post or page you’ve already created and click it to add a link.

Finally, click “Add Link”, and your link will be added where you left your cursor in the post you were writing.

Adding headers and editing text

It’s a good idea to use headers and bolding to make your content easier to read and scan.

How to add headings and subheadings in WordPress

To add a heading, click on the plus sign at the top of the page and type “heading”. the choose the heading block.

Gutenberg heading block

Try to only use “Heading 1” once within your page (usually done automatically with the title so you will probably never need it), and use “Heading 2” or “Heading 3” for other sections in the copy, as this is better for search engines.

Tip: You can also highlight the text you want to change in your blog post, THEN click on the drop-down menu and select the format you want the text to be in.

How to change fonts in WordPress

You can also bold and italicize or change the alignment of your text in a click or two.

  • “B” is for bolding
  • I” is for italics

As you can see, this is all pretty simple for anyone who has worked with Microsoft Word before.

6. Start growing your online audience

Now that you have set up your blog and know the basics, it’s time to make your blog successful. Many beginners struggle at that point, thus I’ve put together a handful of guides to get you going easier.

First I’d suggest you go and check my blogging resources (link at top of page). It contains all the content that I’ve published on StartBloggingOnline.com over the past couple of years.

How to start a blog AND make money

Want to learn how to start a successful blog that makes money too?

Great! I would be more than happy to help you out, head on over to my FREE blogging course signup page from the button at the top of the page and let’s get you even more valuable information to help you seriously crush it! Here’s what I’ll teach you…

Once you have some content on your blog it’s time to get some traffic and make it profitable. I’ll show you:

  • How to choose a niche that  readers are actually looking for
  • How to submit your site to Google ( and the other search engines)
  • How to promote your blog (I’ve used those techniques personally and they’ve worked well)
  • How to monetize a blog (Affiliate marketing, selling advertising space, getting new clients, etc…) in the most profitable ways
  • Add a subscription box (So you could email your blog visitors personally)
  • Blog analytics (set up Google Analytics to track your blog visitors)
  • Finally, if you are struggling to come up with ideas for your posts I’ll send a HUGE list of ideas!

Our #1 Choice For Hosting Blogs

62% Off Exclusive Offer Applied at Checkout

Regularly

$6.95/mo

Starting From

$2.64/mo*

  • Free 1 Year Domain Registration on Select Plans
  • FREE SSL Certificate
  • Drag-and-drop Website Builder
  • E-commerce Ready
  • 1-Click WordPress Installation

FAQs on how to make a blog

How to start a blog FAQ

Yes, blogging is still relevant in 2020, and likely will be for many, many years to come. The written word will always have a place, and advertisers are as interested in blogs in 2020 as they ever were. Over 409 million people read blog posts every month2 (and that’s just on WordPress!) You’re reading one right now in fact!

Here’s how you start a blog from scratch:

  1. Decide what to start a blog about (your niche)
  2. Choose a blog creation platform (CMS)
  3. Pick a great web host
  4. Set up your blogs hosting
  5. Choose and register a domain name
  6. Build a blog design, starting with a great theme
  7. Write and publish your first blog posts

This is exactly what is laid out on this page. Go ahead and scroll to the top to get started. 🙂

Most of the free blogging platforms do not allow you to sell or advertise products on their platforms.

Be happy about this, however! If everybody knew how to set up a blog and earn money it would be a lot more difficult. The small investment needed is a gateway to entry that keeps those who are not serious out of the picture.

But if you are dead set on building a free blog…

Here are some of the most popular types of blog sites:

  • Recipe blogs
  • Fitness blogs
  • Business blogs
  • Sports blogs
  • Blogs about travel
  • Vehicle (cars and automobile) blogs

You can get paid to blog about just about anything, however! Just type “how to choose a blog topic” into the search bar on the top right of the site to see what I mean! (Go ahead, I’ll wait :-).

Blogs are frequently updated with articles while a website is generally “set it and forget it”.

Blogs might also have fewer features than a website and just focus on creating really good content. For this reason, a blog is more socially active, with shares and comments.

If you want to learn more, here’s my post on how to make a website, but you’ll find it covers much of the same ground as this post.

To start a blog with no experience you really just have to take the first step and have faith in your own ability to pick things up along the way.

The first step to learning how to start a blog is getting your hosting and domain name which can seem daunting, but if you sign up for my blogging course (it’s free, see the button at top of page) I’ll walk you through it.

The cost to start a blog varies quite a bit depending on which hosting provider you use and where you get your domain name. This page helps with that as I worked out a special deal so that you can get hosting for as little as $2.64 per month, and you’ll also get your domain name free.

If you mean from a technical standpoint, WordPress is in many ways comparable to writing in Google Sheets or Microsoft Word, so once you find your way around the admin area, it isn’t that hard at all.

If you mean from the standpoint of what your first blog post should be about, then a page explaining who you are, what you are going to be blogging about (and why), along with how others can keep in contact with you. This is a great first step, in fact, it’s called your ‘about page’ and is always one of the first things to write about on your blog.

Here’s how to get your blog noticed:

  1. Build up your social media profiles bit by bit and post links to your new content
  2. Share the work of others in your niche on your social channels
  3. Make sure you use keyword research and basic on-page SEO for your blog posts
  4. Stick within your niche. If you are all over the place, regular readers will lose interest
  5. Try to post on a regular basis so your audience doesn’t forget you
  6. Use your personality: Nobody wants to read boring blog posts so try to make your writing fun
  7. Use images to make your content interesting (these will often also be shared)
  8. Use analytics to measure what is working then do more of that!
650Shares
650Shares

FREE: 3 month course on Blogging & Internet Marketing

was $1997.. get 50 video lessons 100% free

Learn how to...

  • Start a blog from scratch & scale to 6-figures
  • How to write content that Google LOVES
  • How to use Paid Traffic and Affiliate Marketing
  • SEO mastery so that your articles actually rank