Last Updated on
How to create a website: best platform to set up on?
The short answer is “WordPress” which is in a class of its own. While there are several website builders available out there, WordPress is the world’s most popular CMS for creating sites. It powers 33.7% of all the websites on the internet. That’s way more than upstarts like Wix, and it’s the easiest and best platform to learn how to set up a website hands down.
It’s also free and has the best range of themes and plugins on the web. It’s much more reliable than other website builders, and WordPress is also incredibly flexible and works with almost all third-party tools and services you may need for your business or personal site.
The long answer is that I have tried a ton of different website builders like Joomla, Wix, Drupal and so on, but I found you either had to have a degree in HTML, CSS or web design to use them, or they just didn’t offer the same functionality you can reliably get when you pick WordPress to create your website.
Can you teach me how to get started with a WordPress site?
Yes, I can!
I created this step-by-step tutorial on how to create a website from scratch to do exactly that.
This guide is split into 4 different steps and will walk you through each of them from start to finish. Just follow along and you’ll have a website up and running in no time!
Here’s how to make a website from scratch
1. Get set up with a domain name for your website
A common mistake beginners make is choosing the wrong platform while making a website. For most people, a self-hosted WordPress.org website is all they need. It offers thousands of plugins and themes that allow you to build any kind of site you can think of.
WordPress is free to download and use to build websites. But the question is if WordPress is free, where is the cost coming from?
It’s free because you’ll have to arrange your own domain and hosting—this costs a little bit of money (but not much at all).
A domain is your site’s address on the web. It’s what your visitors will type in their browsers to reach your website.

Next, you need web hosting just like all the other sites on the internet. This will be the home of your website on the web.
A domain name will usually cost you anywhere in the range of $10 to $15 per month for basic hosting (but if you follow this guide I’ll show you how to get it cheap. In fact, you’ll get it for a fraction of that price!).
If you’re just starting out, we recommend Hostgator for the beginner. They offer a 45-day money back guarantee also, so if things are not working out for you, you can change your mind later.
Much like page builders, I have tried a ton of different hosting providers like SiteGround, NameCheap, Bluehost, and GoDaddy, but Hostgator has always been the best for speed, uptime, customer service, and reliability.
You can, of course, choose a different hosting platform. But for this example, I’m going to use Hostgator as it makes it super convenient to build a WordPress site with just a few clicks.
2. Choose a web hosting company
First, head over to Hostgator and click on the big yellow button for the “Hatchling” plan.
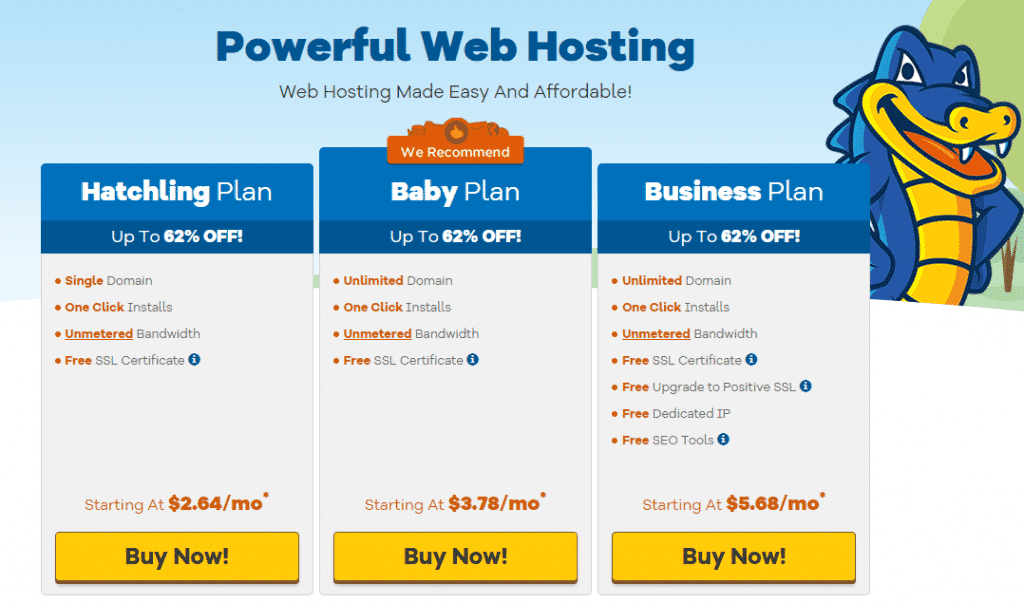
Next, you’ll need to select a pricing plan for your site. The Baby Plan is the most popular plan among most users, be as I said, I believe you can go with Hatchling and upgrade later if you need to.
After choosing a plan, the next step is to choose a domain name.
46.9% of websites use a .com domain. So, consider sticking to a .com domain name for your first website rather than something like .net or .org. Also, make sure it’s related to your business/brand, easy to spell and pronounce, and easy to remember.
Once chosen, click “Next” to continue. Here, you need to provide account information (e.g., your name, address, email, etc.).
The next steps are pretty easy:
- Confirm your billing cycle and package type
- Create a username and security pin
- Scroll down to uncheck the hosting add-ons (you don’t really need them for your website to run flawlessly)
You will receive an email right after completing your purchase. It will show you the details on how to login to your hosting control panel, otherwise known as cPanel.
Now, go to the hosting dashboard where you can manage everything, such as setting up emails, getting support, etc. But most importantly, this is where the real magic happens—installing WordPress.
3. Add a WordPress site with your web host
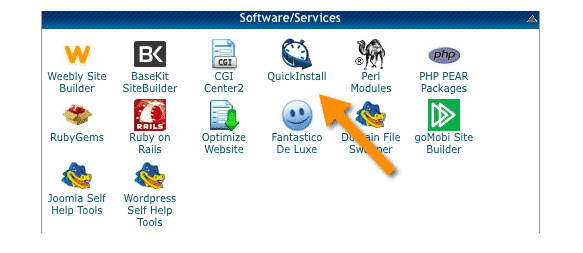
One of the easiest ways to install WordPress using Hostgator is via QuickInstall. It makes the installation process simple and you’ll have your site up and running within minutes.
First, log in to your Hostgator cPanel. Then under Software/Services, click QuickInstall.
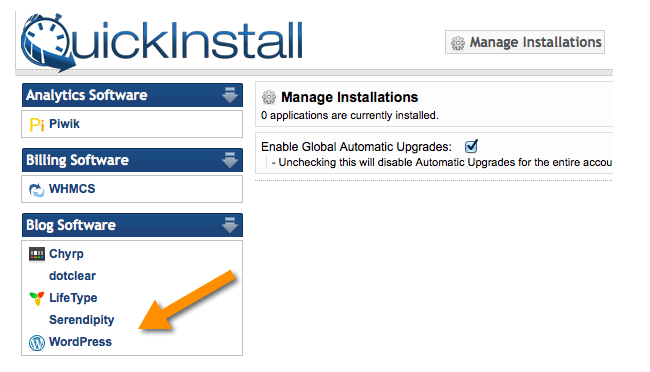
Next, select “WordPress” under the category labeled “Blog Software.”
Next, select the domain where you plan to install WordPress. Choose your domain name from the dropdown field, then hit “Next”.
Now, enter the name of your website, admin username, and a password, and don’t forget to make a record of what they are! (You can also change the login and password later in WordPress settings.)
Your WordPress installation should start now. Meanwhile, QuickInstall will display a few website templates you can install on your WordPress site. You don’t necessarily have to do that right now as we’re going to show you how to set up and install a free template later in this guide.
Once the installation process is over, it’ll show you a success message in the top header.
Now, click on the link that says “Installation Complete”. This will bring you to the page where you enter your WordPress Login URL and password.
Congratulations! You’ve successfully learned how to create a website using QuickInstall.
Now, you can go to your WordPress login page. The Login URL should look like this:
yourwebsitename.com/wp-admin, but the “yourwebsitename” part will be your domain name (just type it into your browser).
You can log in to your website from here using the admin username and password you previously entered in the process.
That was easy, right?
Now that you know how to install WordPress with your web host, let’s move on to the fourth step and help you choose the best design for your site.
4. Build out your website design with a theme
The visual appearance of your website is controlled by a WordPress theme. These themes are professionally designed templates which you can install on your site to change its entire appearance any time you like.
Once you set up your WordPress website, you’ll notice that it comes with a basic theme that looks something like this:
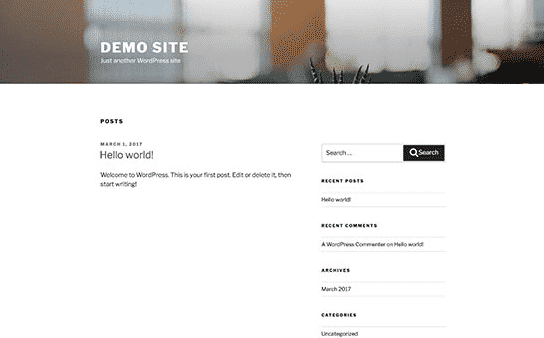
This isn’t very appealing to most people. Don’t worry, though. There are thousands of WordPress themes available to install on your website which give limitless scope for customization.
To change your website theme, go to the WordPress admin dashboard. Now, head over to Appearance >> Themes page, then click “Add New”.
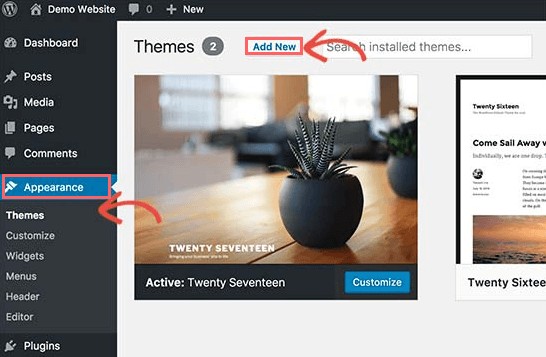
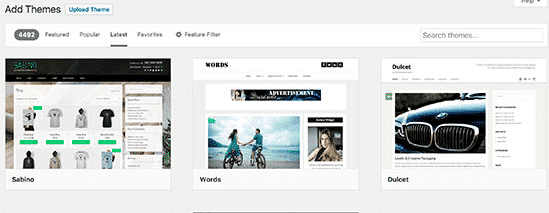
Here, you can search through the free and paid themes available in the official WordPress.org directory. You can sort them out by featured, latest, popular, as well as other filters like industry, layout, etc.
Once installed, you’ll be able to customize your theme by clicking on the Customize option under the Appearance menu. This will take you to the theme customizer screen where you can change its settings with a live preview of your site.
5. Create pages and start to write for your audience
WordPress offers two default content types: Posts and Pages.
I know, what’s the difference right?
Posts are part of a blog that appears in reverse-chronological order (newer content displayed first) this is where you actually write content that is personalized for your company customers or your websites readers.
Pages, on the other hand, are meant to be static “one-off” type content like your contact page, about page, privacy policy, etc.
By default, WordPress will display your blog posts on your website’s front page. You do, however, have the freedom to change this setting and make WordPress display any page as the front page of your site if you want.
That said, let’s get started adding some content to your WordPress site.
Pages
First, if you want to know what sort of thing pages should be used on, you can check out our “website pages list” article which will help you get an idea of what you need.
Visit Pages >> Add New in your admin area, which takes you to the page editor interface.
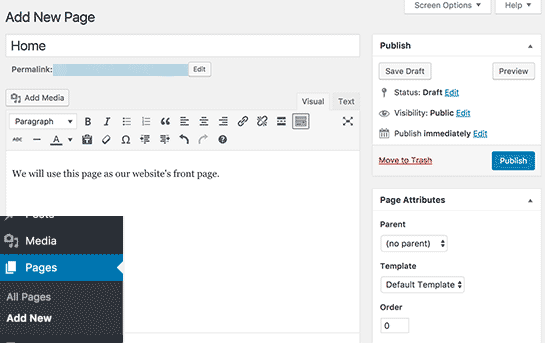
Add a title for your page and write content in the editor below. Here, you can add text, images, links, embed videos, audio, etc.
Now, hit the publish button to make it go live on your site. You can repeat this process by adding more pages for different parts of your website.
Let’s add a couple of blog posts!
Posts
Visit Posts >> Add New, and you’ll see a screen like this:
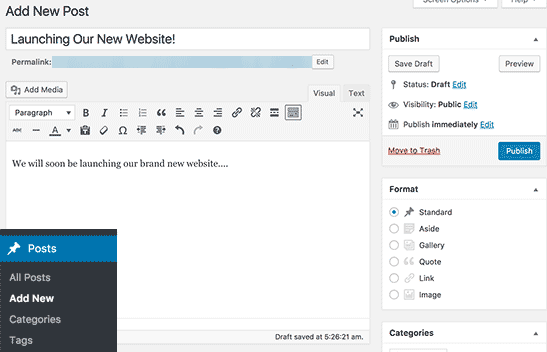
Choose a post title and add content in the visual post editor. You’ll notice some additional options here like categories, tags, and formats, but don’t worry about them just yet.
You can save your post as a draft or immediately publish it on your website. Just make sure it’s polished first! 🙂
6. Get a head start with plugins
Plugins are like apps for WordPress websites. They allow you to add a variety of features to your site.
There are currently over 50,000 free WordPress plugins available to install. You can also find plenty of paid plugins developed and sold by third-party developers and websites, there are even software solutions to create an online store (like WooCommerce) for your business later if you find you want to take this route on one of your domains.
Here are a few great WordPress plugins you should consider installing right away depending on the features you need.
Features
- Envira Gallery Lite: enables you to add stunning photo galleries to your website.
- WPForms Lite: lets you add a contact form to your site.
- Monsterinsights: allows you to connect your WordPress site with Google Analytics and see how users find and utilize your website so that you can keep them coming back.
Website Optimization
- WP Super Cache: enhances your site speed by serving cached pages which massively improves performance and speed.
- Rank Math SEO: improves your website SEO to get more traffic from Google.
Security
- Sucuri: website malware scanner and security audit
- Updraft Plus: best option to create automatic backups of your WordPress site
You just learned how to build a website from scratch!
The cool thing about the whole process presented in this article is that you can do it all by yourself without any professional help.
If you can learn how to start a website by following the simple steps mentioned above, then it’s going to be the most budget-friendly solution for you.
Have any questions regarding how to make a professional website? Ask away in the comments below, or join my free blogging course where you can ask me questions directly via email!