Want to know how to transfer wordpress.com to wordpress.org? In this post, I’m going to give you the exact step-by-step instructions on how to do that.
First of all, however, let me just point out that there are services that will take care of this for you like CMS2CMS if you find the whole thing too technical, overwhelming, or you just plain don’t want to learn how to migrate wordpress.com to self hosted options.
Now let’s dive into some of the reasons why people should be doing it:
WordPress.com is a great tool for new bloggers to begin flexing their creative muscles and get a feel for the platform.
But it does have a lot of limitations—you’re subject to WordPress.com’s terms of service, you can’t upload the plugins you want to or use any custom themes, and you can’t monetize “your” site, simply because all of the ad space doesn’t belong to you, it belongs to WordPress.com.
In other words, while you might call it “my blog” it’s not really your blog/website at all.
WordPress.com can’t compare to the flexibility and freedom that a self-hosted version of WordPress offers.
Upon switching, you’ll be rewarded with better design options, loads of space, and way more opportunities for eCommerce.
For professional bloggers (and those who want to be pros), making this move is a no-brainer.
You might also like:
Table of Contents
Here is how to transfer WordPress.com to WordPress.org
1. Sign up for web hosting and a domain name
When switching from WordPress.com to WordPress.org, first and foremost, you’re going to need a domain and a hosting provider. If you already have both of those—you’re ahead of the game! Feel free to skip this step.
If you don’t yet have a personal domain or hosting provider, I recommend HostGator Hosting—they’re inexpensive, reliable, offer great support, and you’ll be able to grab both – your hosting and domain name from them.
They’re currently $2.64 month with my link (above), so probably cheaper and more reliable than BlueHost, GoDaddy etc… HostGator tailors their service to bloggers and boasts very close to 100% uptime, meaning that you (and your fanatic followers) don’t have to worry about your site going offline.
Phew.
Don’t panic. This process is fast and easy, and I’ll walk you through every step.
Login to your HostGator control panel (login information should be in your inbox), and then look at the left sidebar. About halfway down the page, you should see a button to Install WordPress. Click it!
You’ll be taken to Mogomarketplace.com—the site HostGator uses to help you install new platforms. Here, you’ll have the option to either “Install” or “Import” WordPress. Choose Install.
You should now see a loading bar at the top of your page. When it’s done, you’ll be able to see your login credentials:
P.S. The links above are HostGator affiliate links, but they are only for a discount. If you want, though – you can use any other host as long it’s reliable and with unlimited bandwidth and storage.
P.S.S: If you’re not using HostGator, try visiting your host’s webpage for specific details on installing WordPress, or check out this WPBeginner how-to page which runs through installation instructions for numerous hosting platforms).
If you need more help with this step, or if you just want some more of my advice on choosing a domain name, finding hosting, or hunting down the best blogging platform, I have a more detailed breakdown on my homepage.
2. Data migration on your move from WordPress.com to WordPress.org
Now that you have your domain and hosting, it’s time to migrate your blog.
First, we’re going to create a file that will let you transfer your content, pictures, comments, and all the other essentials of your blog.
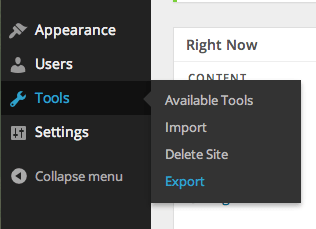
To do this, login to your WordPress.com dashboard and click Tools on the left sidebar menu. You’ll now see an option to Export, which should look like this:
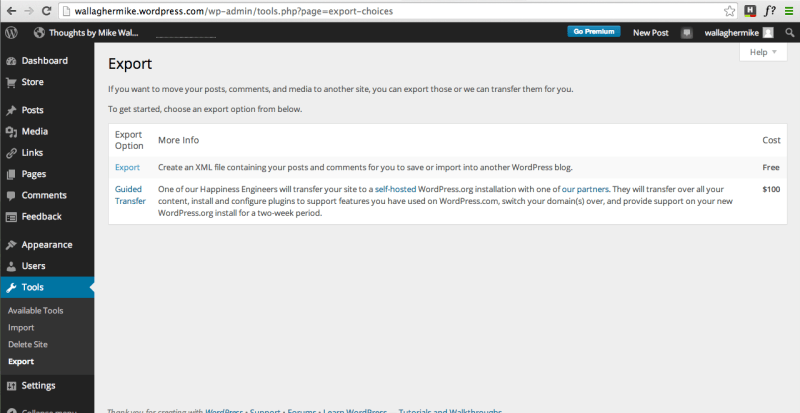
Next, you’ll see a few different options for migration. I STRONGLY SUGGEST using the Free Version and following this tutorial. Don’t waste your money on the guided transfer—you’ve got me to walk you through this process, after all!
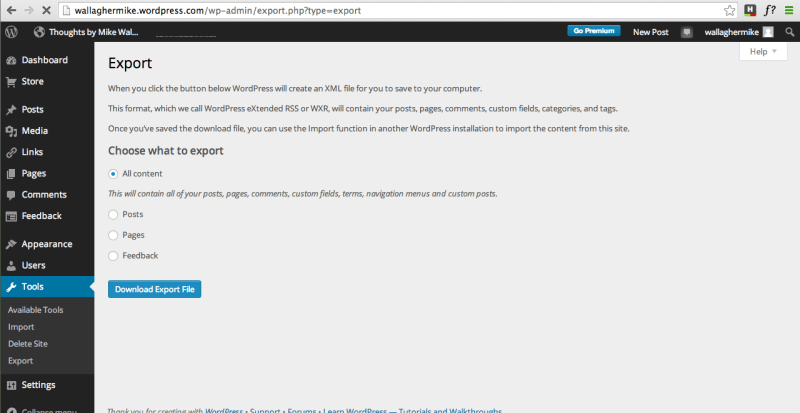
Now you need to decide which content you want to transfer. This step is really pretty simple: choose All content, in order to migrate all of your files, posts, pages, comments, categories, etc. Then click Download Export File to have the system automatically create an XML file.
Remember to save the .XML file to your computer—we’ll need it for the next step!
3. Import content to the new self-hosted blog
The next step in your move from WordPress.com to WordPress.org is to transfer all of the data you just saved from your old blog to the new, self-hosted blog that you set-up in Step 1.
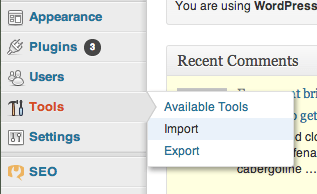
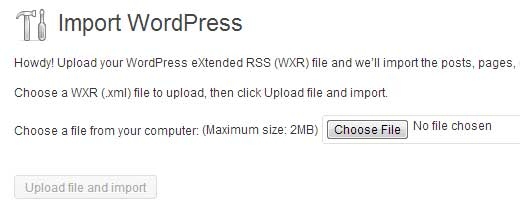
To do this, login to your self-hosted blog’s dashboard via mydomainname.com/wp-admin (replacing “mydomainname” with your domain name, of course), and pick Tools from the sidebar. From here, you should be presented with an option to Import new data, like so:
Now you’ll see a list of blogging platforms that you can import data from. Since we’re moving from WordPress.com, scroll to the bottom of the list and select WordPress. When you’re asked to choose a file from your computer, choose the .XML file we created in Step 2.
After a minute or two—voilà! Your blog should be fully migrated, and you’ll be sitting pretty with all of your great content on a website that you can call your own.
4. Import your links
If you’ve been relying on WordPress.com’s Links feature whenever you include a hyperlink in a post, then you’ll need to export your blogroll links as well. If you haven’t been using this feature, please skip to Step 5.
You need to make sure that your site isn’t riddled with broken links after your move—for that, you’ll need to export your WordPress.com blogroll.
Your first step is to download a Link Manager plugin on your self-hosted blog. Once you’ve downloaded the plugin, make sure you click Activate. After it’s activated, you should see a new option in your side menu called Links.
From here, you can import your links… but first, we need to export them from your WordPress.com blog. To do this we must save your blogroll in OPML format. Don’t worry, it’s easier than it sounds!
Simply type: mydomainname.wordpress.com/wp-links-opml.php into your address bar (again, subbing out “mydomainname” with your domain name). This will bring up an OPML file of your blogroll in your browser window, and you can save this information to your hard drive by pressing Command+S on your Mac or CTRL+S on your PC.
Congratulations, you’ve just backed up your links!
Now that you’re equipped with your OPML file, and your self-hosted site has a Link Manager, it’s time to import your links. On your WordPress site click Tools and then Import. You’ll now be instructed to upload the OPML file you saved.
And it’s really that easy! Wait for the progress bar to finish, and WordPress to verify a successful transfer, and then move onto the final step…
5. Finishing touches
There are just one or two final things to do before you’ve finished migrating your blog to its newer, better home:
- Update your links. You’ve already updated your blogroll, so all external links should be taken care of—all you need now is a bit of house cleaning! If you’ve ever inter-linked your posts to each other, make sure you revisit those and update them to match your new domain.
Link maintenance may seem tedious, but think of this like moving to a new house—you need to inform every service you’re signed up for and mailing list you’re subscribed of your new mailing address, or else your letters will never reach you.
- Make your WordPress.com blog private. You probably don’t want visitors to discover your old site in lieu of the new. To solve this problem, make your old blog private by clicking Settings, then Reading on your WordPress.com dashboard. Then select “I would like my site to be private.”
Of course, because you have a crowd of followers hanging on your every word, you don’t want to up and move without warning, so you should probably…
- Make a post advertising the move. Keep your fan base in the loop—make sure they know about the move and can still find you afterward. Make a post informing your followers about the domain change.
One final note, WordPress.com sells a Site Redirect service, which will automatically send every visitor to your new blog. It’s a great option… with a dual purpose!
In addition to making sure that your followers can find you, Site Redirect will also ensure that Google and other search engines are redirected to your new blog, so you don’t lose any valuable SEO you’ve built up over your blogging career.
Remember, WordPress.com is a great tool for classroom blogs or people dipping their toes into the blogging world, but when it’s time to go pro, you can’t beat a self-hosted blog so if you want to transfer WordPress.com to WordPress.org you’re making the right move. The basic software is free—meaning there’s never been a better time to make the move!

Our #1 Choice For Hosting Blogs
62% Off Exclusive Offer Applied at Checkout
Regularly
$6.95/mo
Starting From
$2.64/mo*
- Free 1 Year Domain Registration on Select Plans
- FREE SSL Certificate
- Drag-and-drop Website Builder
- E-commerce Ready
- 1-Click WordPress Installation

Related articles:


