How to Install WordPress Using Softaculous (With Ease)

Last Updated on

Wondering how to install a WordPress? I am here to show you the quick and easy way to install it with the Softaculous app. I promise after reading this guide, you will find installing WordPress a piece of cake. So let’s begin it.

Installing WordPress through Softaculous App installer is fairly easy. There are plenty of reliable web host providers available that offer this simple installation feature. So first of all, you need to have a hosting provider that offers this app installer.

If you’re ready with your hosting and domain name you may move further with the installation procedure.

You might also like:

How to install WordPress with Softaculous

1. Click Softaculous WordPress install app

Now you might be thinking where can I find this app! Well! It is available on the dashboard of your hosting. Login to cPanel and search for the ‘Softaculous app’. You can easily find the icon with the same name.

Softaculous on cPanel

Next, click on it and proceed to the next step.

As soon as you will click on it, you will see a list of popular apps and scripts like WordPress, Joomla, Drupal, Magento, etc. These are free apps provided by your hosting provider right on their cPanel.

Select WordPress in Softaculous

Out of these popular applications, you have to search for “WordPress”‘ hit “install” and follow the further steps.

Next, you have to make software setup as you can see in the following screenshot.

2. Add Installation location

WordPress installation location

First of all, choose the protocol for your domain name. If you’re using SSL certificate for your domain, choose “https” and if you are having a non-SSL domain then choose “http”.

Next, you have to select the domain that you want to connect with WordPress.

Now go with the 3rd step and select the directory location where you want this app to be installed. In case you don’t want to install this app in any directory instead want to install in the base directory then you should leave this option blank.

3. Enter your WP admin login details

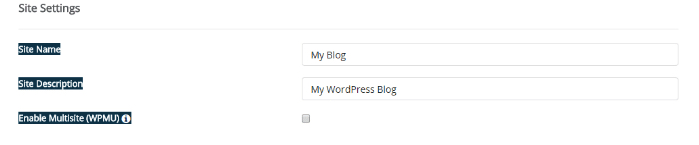
In this step, you need to enter the login details of your WordPress admin. I suggest you to choose strong admin credentials to add extra security to your website.

Use a combination of capital letters, small letters, special characters, and symbols. Make sure you note it down somewhere until you memorize it. The next thing you need to do in this step is to enter admin email id.

This email id will be required to receive the notification about the different updates on your website.

4. Enter your website details

Enter WordPress site name and description

In this step, you need to mention the site name of your blog or website. This site name can be something similar to your business niche or domain name.

For instance, if you’re setting up a blog on ‘Home decor’ then the name of your website can be something like ‘Home Decor Tips and Tricks’. Make sure whatever name you pick it best describes your website niche.

Next, you have to give a short description to your website or blog. It is a good place to describe your business. Enter a relevant description and follow the next step.

5. Enter your WordPress database name

Next, click on a small “+” button you might be viewing on your screen. It will take you to ‘Advance Options’ where you have to enter the database name for your blog. In case you do not want to provide database name manually, installation process by itself generates the database for users.

However, if you want the database to use your given name, then click on the “+” button. It will automatically create options for you. These options require you to enter the database details. Just enter the same database credentials you that you created in the earlier step.

Now you are all set to install WordPress. Hit the “install” button, it will start the installation process of your WP website.

6. Complete installation process

Installation process may take some time (Usually 4 to 5 minutes). The process will read all your submitted credentials or data.

Let this process run until it achieves 100%. Congratulations! Your blog has successfully been set up. Now you are ready to make your first post.

This was only one way to install WP if you’re looking for a complete guide see our main WordPress installation guide at the link on the bottom of this page.

Important things after a Softaculous WordPress install

  1. Choose the best-suited theme for your business niche. By default, WordPress comes with a simple theme, you can change it with the theme that suits best your brand and style.
  2. Add categories carefully. Categories are crucial to giving your audience a better user-experience.
  3. Spam can a big threat to your newly built website. Therefore, you should prevent it by activating some security plugin such as Akismet. It is one of the top-rating plugins for spam.
  4. Don’t forget to install plugins that are essential for the proper functioning of your WordPress site such as SEO by Yoast, Contact Form 7, SumoMe, Super Cache, WordFence, etc.
  5. To track the performance of your blog you may install Google Analytics plugin. It will help you monitor the traffic on your site and behavior of your audience as well.
  6. You should not forget to remove the sample content post (Hello World). After installing WordPress, you will find sample content which is not important. So before you go live, delete all the links and sample pages.
  7. Create a favicon. It can play a big role in increasing the overall quality of your website.
    Create your ‘About Us’ page to better introduce your blog or site to your audience.
  8. Edit your permalink structure to make your URLs search friendly both for humans and search engines. Modify it before publishing. See the following example:
  • WordPress Default Permalink Format: .domain.com/?=n
  • Custom Permalink: domain.com/first-post-name

I hope this guide provides you easy and valuable information on installing WordPress using the Softaculous App installer.

Our #1 Choice For Hosting Blogs

62% Off Exclusive Offer Applied at Checkout

Regularly

$6.95/mo

Starting From

$2.64/mo*

  • Free 1 Year Domain Registration on Select Plans
  • FREE SSL Certificate
  • Drag-and-drop Website Builder
  • E-commerce Ready
  • 1-Click WordPress Installation
0Shares
Share or comment
0Shares

FREE: 3 month course on Blogging & Internet Marketing

was $1997.. get 50 video lessons 100% free

Learn how to...

  • Start a blog from scratch & scale to 6-figures
  • How to write content that Google LOVES
  • How to use Paid Traffic and Affiliate Marketing
  • SEO mastery so that your articles actually rank